
Server-Side Tracking Implementation
Configure in DNS Provider
Wunderkind Server-Side Tracking is now available for any client. Implementation steps for Cloudflare-hosted versus non-Cloudflare-hosted clients are below.
Setup DNS configuration if site NOT hosted on Cloudflare
Please update your hosting provider's configuration to proxy requests for a new subdomain under your main site domain to our API.
Add a CNAME redirect in your DNS settings:
- Navigate to the DNS settings for your website
- Click Add Record to create the new subdomain record
- For Type, select "CNAME"
- For Name, please add a subdomain name "wd" (e.g. wd.clientsite.com)
- For Target, enter
cdnwd.com - Lastly, save the new record
Setup DNS configuration if site hosted on Cloudflare
Please update your Cloudflare configuration to proxy requests for a new subdomain under your main site domain to our API.
Part 1: Add a CNAME redirect in your DNS settings:
- Log in to your Cloudflare account and select your account and domain
- Navigate to DNS
- Click Add Record to create the new subdomain record
- For Type, select "CNAME"
- For Name, please add a subdomain name "wd" (e.g. wd.clientsite.com)
- For Target, enter "cdnwd.com"
- Ensure that Proxy Status is enabled as says Proxied
- Optionally, enter a Comment for the record
- Lastly, save the new record
Once you're done, the UI should look like this (in this example, "track" was used as the subdomain):

Testing DNS Configuration
You can use the dig command to test if your dns configuration is working as expected. We will use wd.example.com for the steps below, but you'll need to replace that with your own domain.
Mac/Linux (using dig)
Run:
dig wd.example.com +short
Windows (using nslookup)
Run:
nslookup wd.example.com
Not working
If nothing returns from the dig or nslookup command, the DNS configuration is not set up.
CNAME Configuration Result
If DNS is set up properly via CNAME the result will show
- Domain the CNAME is pointing to.
- The IPs that cdnwd.com is pointing to.
Example (dig output):
% dig wd.example.com +short
cdnwd.com.
104.21.16.233
172.67.216.214
Example (nslookup output):
> nslookup wd.example.com
Server:  your.dns.server
Address:  xxx.xxx.xxx.xxx

Non-authoritative answer:
wd.example.com   canonical name = cdnwd.com
Name:    cdnwd.com
Addresses: 104.21.16.233
          172.67.216.214
Cloudflare Configuration Result
If DNS is set up properly via Cloudflare proxy, only the IPs are shown.
Example (dig output):
% dig wd.example.com +short
104.21.16.233
172.67.216.214
Example (nslookup output):
> nslookup wd.example.com
Server:  your.dns.server
Address:  xxx.xxx.xxx.xxx

Non-authoritative answer:
Name:    wd.example.com
Addresses: 104.21.16.233
          172.67.216.214
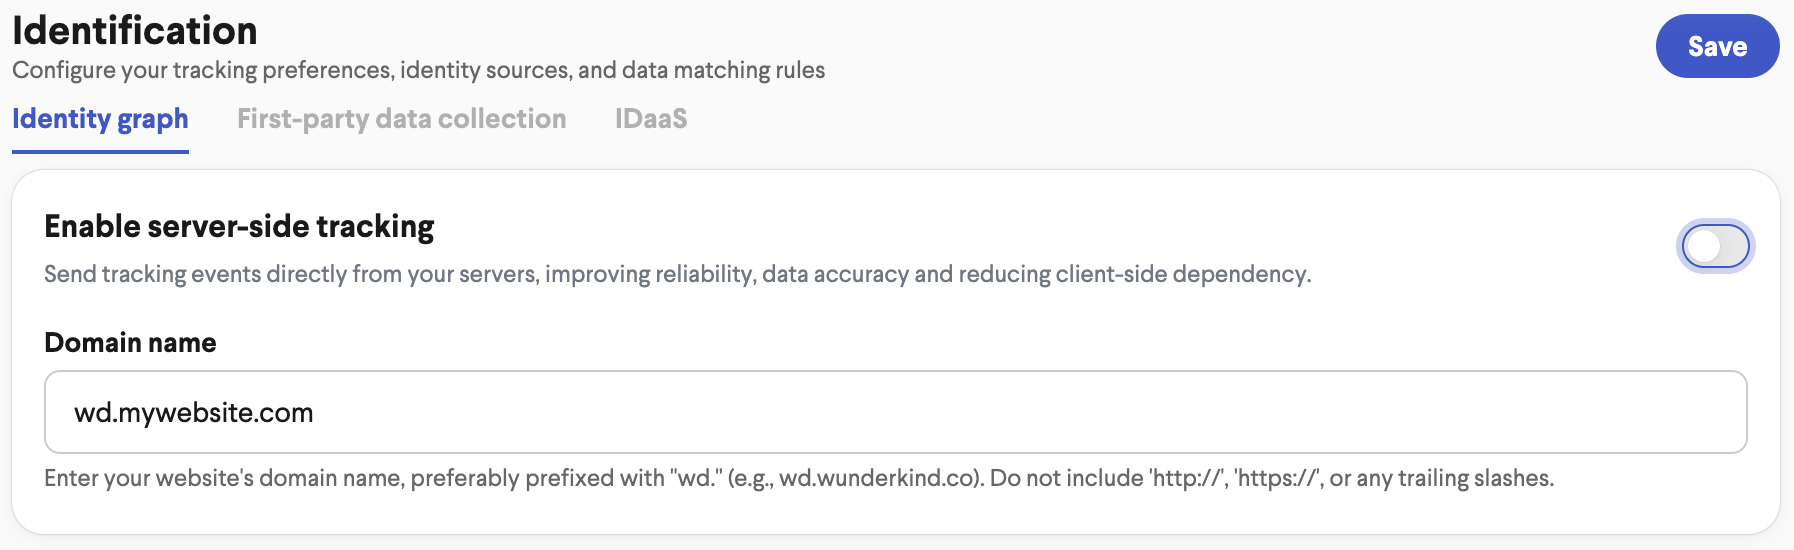
Setup within Wunderkind Autonomous Marketing Platform
To set up server-side tracking in the Wunderkind Autonomous Platform:
-
Log in to the Wunderkind Autonomous Marketing Platform
-
Within the Platform, navigate to Settings -> Identification
-
On the Identity Graph tab:
-
In the Domain name field, input ‘wd.’ followed by the website you are trying to enable (e.g. wd.website.com)
-
Toggle the switch to enable Server-side Tracking.
-
Click the Save button.
The process may take a few minutes (~5 to 10 minutes) to complete. You can navigate away from the window while it processes.
Once Server Side Tracking is enabled, you should see the following notification at the bottom of the page.
-

You should also see a Complete status next to the toggle.
-

Confirm Server-Side Tracking is enabled
Navigate to https://tag.wknd.ai/your-website-id/i.js and check that tag_state_domain_enabled is set to true.
Domain Health Check
Wunderkind performs domain health check on a certain frequency to validate client domain status once client has Server-side Tracking enabled properly. Requests are send to https://client-domain/state/check-domain with wknd-bot as user agent.